Custom DERP Server
What is this for?
Section titled “What is this for?”This guide is for people who want to run their own DERP server for their Tailscale network (Tailnet) or for their own self-hosted Headscale Tailnet. This guide will go over how to setup a custom DERP relay for Tailscale in certain conditions. You will be able to setup a DERP relay using a non-standard HTTPS port or behind a reverse proxy. The DERP relay that will be used is fredliang/derper
Requirements
Section titled “Requirements”- A Linux server with Docker to host a DERP relay on
- A domain or dedicated subdomain pointed towards the server
- The ability to expose ports on your server to the internet
- Prior knowledge on configuring and managing remote servers
Non-Standard HTTPS port
Section titled “Non-Standard HTTPS port”You may already have a public server that you have lying around, but it has ports 80 and 443 taken up by a reverse proxy like NGINX or Traefik. In my case, I have a public VPS to host some simple Docker services like Gotify and PsiTransfer. Those services are behind Nginx Proxy Manager+ and using that for TLS and fun wildcard domains.
No worries! You can host the DERP relay on a non-standard HTTPS port. It’s relatively simple.
- Make a new folder for the DERP relay and enter it
mkdir derper && cd derper- Add a folder to the DERP relay folder
mkdir certs- Make a
docker-compose.yamland open it
touch docker-compose.ymlnano docker-compose.yml- Edit
docker-compose.yamlto have this text
services: derper: image: fredliang/derper container_name: derper restart: always ports: - 3478:3478/udp - 8443:443 environment: - DERP_DOMAIN=derp.domain.com - DERP_ADDR=:443 - DERP_HTTP_PORT=-1 - DERP_CERT_MODE=manual volumes: - ./certs/fullchain.pem:/app/certs/derp.domain.crt:ro - ./certs/privkey.pem:/app/certs/derp.domain.key:ro- Don’t forget to change
derp.domainto the domain or subdomain you have setup for the server. If needed, change port 8443 to some other non-standard port. - You will need to expose the non-standard HTTPS port and STUN port. You may need to go to your server provider’s firewall to open the port as well as on the server itself.
- Get Let’s Encrypt HTTPS certificates for your domain.
You’ll need an A record on your DNS provider that points your domain or subdomain to your server’s IP. After that, you run a tool like Certbot to grab a certificate for your domain using the HTTP-01 challenge. Make sure that the server has ports 80 and 443 open. Once you get your certificates, you can point the volumes in docker-compose.yml to the location of your fullchain.pem and privkey.pem or paste your certificates into your certs folder.
- Spin up the DERP relay!
docker compose up -dBehind a reverse proxy
Section titled “Behind a reverse proxy”You can also host a DERP relay behind your reverse proxy and run it behind ports 80 and 443. This guide will go over setting up a DERP relay behind Nginx Proxy Manager+
How does this work?
Section titled “How does this work?”Normally, the DERP port will be 443 and you will be forced to use TLS. This usually doesn’t work very well with reverse proxies, which people usually use to handle TLS to their services.
However, if you use 80 as the DERP port, it will not use TLS, and serve normal HTTP. This would allow the reverse proxy to take over, and allow it to handle TLS for the DERP relay.
Setting up Nginx Proxy Manager+ (NPM+)
Section titled “Setting up Nginx Proxy Manager+ (NPM+)”- Make a new folder for NPM+ and enter it
mkdir npm-plus && cd npm-plus- Add a
datafolder to the NPM+ folder
mkdir data- Make a
docker-compose.yamland open it
touch docker-compose.ymlnano docker-compose.yml- Edit
docker-compose.yamlto have this text
services: npmplus: container_name: npmplus image: docker.io/zoeyvid/npmplus:latest # or ghcr.io/zoeyvid/npmplus:latest restart: always networks: - proxy dns: - 1.1.1.1 ports: - 80:80 - 443:443 - 81:81 volumes: - "./data:/data" environment: - "TZ=America/Chicago" # set timezone, required, set it to one of the values from the "TZ identifier" https://en.wikipedia.org/wiki/List_of_tz_database_time_zones#Listnetworks: proxy: external: true- You will need to expose the ports 80 and 443. You may need to go to your server provider’s firewall to open the port on their side as well as on the server itself.
- Port 81 will also have to be exposed for NPM+‘s admin panel. You can setup the panel behind a domain or subdomain and not need to expose port 81.
- Create a Docker network for NPM+
docker network create proxy- Spin up NPM+
docker compose up -d- Return to the starting folder
cd ..Setting up the DERP relay
Section titled “Setting up the DERP relay”- Make a new folder for the DERP relay and enter it
mkdir derper && cd derper- Make a
docker-compose.yamland open it
touch docker-compose.ymlnano docker-compose.yml- Edit
docker-compose.yamlto have this text
services: derper: image: fredliang/derper container_name: derper restart: always ports: - 3478:3478/udp networks: - proxy environment: - DERP_DOMAIN=derp.domain.com - DERP_ADDR=:80 - DERP_HTTP_PORT=80networks: proxy: external: true- Don’t forget to change
derp.domainto the domain or subdomain you have setup for the server. - You will need to expose the STUN port. You may need to go to your server provider’s firewall to open the port as well as on the server itself.
- Spin up the DERP relay!
docker compose up -dConfiguring NPM+ for the DERP relay
Section titled “Configuring NPM+ for the DERP relay”This assumes you’ve completed the first time setup for NPM+ and can access the admin panel.
- Add a new
Proxy Host

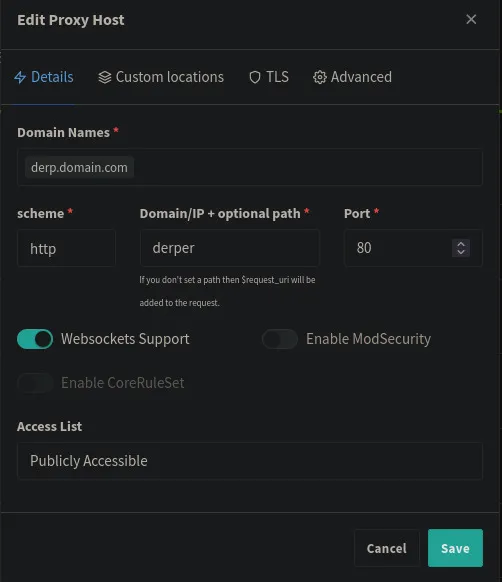
- On the
Detailstab
- Add your DERP domain or subdomain to your
Domain Names - Set the
Domain/IP + optional pathtoderper - Set the
Portto 80
- On the
TLStab
- Request a new certificate
- Agree to Let’s Encrypt Terms of Service
- Force HTTPS
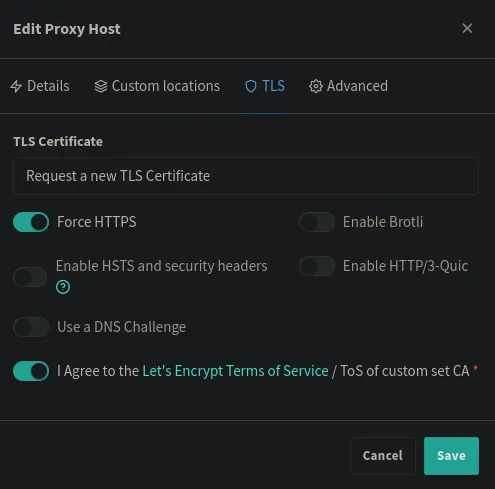
- Save the configuration
Testing connectivity to the DERP server
Section titled “Testing connectivity to the DERP server”This assumes you have Tailscale installed on your client and can use the Tailsclae CLI. To add your DERP server to your Tailnet, you can follow the steps provided by Tailscale here.
Once you have added it to your Tailnet policy, you can test connectivity to your DERP relay using tailscale debug derp <region-id>.
An successful DERP connection will look something like this.
{ "Info": [ "Region 998 == \"random-vps-derp\"", "Successfully established a DERP connection with node \"derp.domain.com\"", "Node \"derp.domain.com\" returned IPv4 STUN response: client-ip:41017" ], "Warnings": null, "Errors": [ "Error connecting to node \"derp.domain.com\" @ \"derp.domain.com:443\" over IPv6: dial tcp6: lookup derp.domain.com on 127.0.0.53:53: no such host" ]}I got an error as I don’t have an IPv6 IP for my domain. The DERP server works regardless of that error.
You can also test latency to your DERP server using tailscale netcheck and viewing the resultant report.
Report: * Time: 2025-08-01T20:14:54.12745344Z * UDP: true * IPv4: yes, client-ip:40784 * IPv6: no, but OS has support * MappingVariesByDestIP: false * PortMapping: UPnP, NAT-PMP * Nearest DERP: <obfuscated for privacy> * DERP latency: - random-vps-derp: 36.3ms (random-vps) ... <other relay servers> ...You can also run tailscale debug derp-map in order to get an list of all available DERP servers for your Tailnet. Your DERP server should look like this
"998": { "RegionID": 998, "RegionCode": "random-vps-derp", "RegionName": "random-vps", "Nodes": [ { "Name": "998", "RegionID": 998, "HostName": "derp.domain.com", "IPv4": "server.ip", "STUNPort": 3478, "DERPPort": 443 } ] },